While I hope to be able to draft and sell some patterns one day, I’ve decided to give my first one away for free!

Handwoven scarf in purple and navy

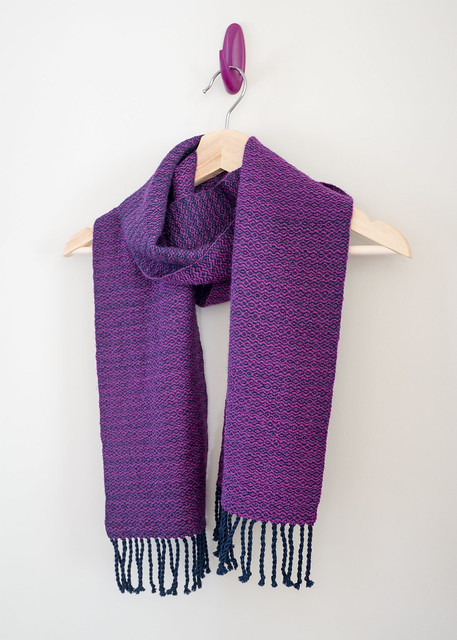
This scarf weaving pattern contains  all the charts you need and details on how I wove it. The document is not suitable for those who have never woven before — it assumes you have woven a few items and that you are familiar with your loom. I have, however, added some tips just in case you aren’t familiar with the methods that I’ve used. You may like to do things differently, and that’s fine too.

Requirements: 4-shaft loom, 9 inch weaving width, 10-dent reed for 20 epi
More details are in the PDF.

Since this pattern is available for no cost, I ask that you use it to make items for yourself or for gifting only. As it’s also my first pattern, any constructive criticism will be accepted, but please be courteous.

Finally, here is the link to download the PDF: Warm and Stylish Twill Scarf Pattern

Handwoven scarf in purple and navy

It’s about time I changed things around here. Of course I’m still considered very lazy, because I am using a pre-created theme and not designing my own. The only thing I did was make a header image.

Just for records, I shall screenshot the new blog design.

I hope this new change will help me keep up with updates. I don’t think people really follow my blog, but hopefully, I won’t mind talking to myself.  😀

It’s the new material I’m working with lately. Instead of cutting and bending thick, hard wire and soldering, I just carve it out of a block of modelling wax and then send it to the casting company. It saves me money because I don’t have to buy precious metal in advance. Wax is a lot less dear should I make a mistake.

I’m currently making rings for myself, while I figure out the intricacies of carving, casting, setting and finishing. I wouldn’t want to sell products before I was ready, would I? 😀

Here are some behind the scenes photos:
Rings in progress
The left one is actually my wedding ring! (it will be a little larger in size than I should make it, but I’ll be wearing it on my right hand)

Wax ring prototype
This ring is still in the works. I modified it since this photo session. It will hold the Old European Cut stone also shown.

Trying on the rings
Here I am trying them on. My finger size is a bit smaller than the pre-drilled holes that wax ring tubes come in, so I don’t even need to enlarge the hole. For some designs, I may need to carve the ring from a solid block of wax instead of using ring tubes.

Purple wax is my favourite, and not only because of the colour! 😉 I find that it doesn’t clog up my bench files and isn’t gummy in texture. I have used blue wax which is softer than purple, and I don’t like it as much. BUT pink wax is the WORST ever. Being a novice, I tried to carve the gummy wax with my wax file and it clogged up to the point where I had to dig out the wax bit by bit with a piece of copper, since using a metal brush didn’t work. Don’t make that mistake, because it will take you an hour to fix up the mess.

More updates on my projects soon to come.

Last night, instead of just doing nothing or working on polymer clay, I decided to make something using memory wire. I must say that I’m not good at designing with it. There are so many wonderful styles that can be accomplished. I even ordered a couple of finished bracelets from Etsy sellers. They were so pretty. I want to learn from the designs, but definitely not to copy and sell… I just admire them. They’ve been on my favourites list for ages. Here’s what I bought: New Years Resolution and Lavender Pixel Triplets.

So here is what I made…


It’s single layer, pretty much like a bead bangle, really. I joined the ends together, because the bracelet kept opening up. It’s a little too big for me, but that’s how I can manage to get my hand into it.


The bracelet is asymmetrical, yet there is a visible pattern. That’s also one reason why I think it looks good. Forgive me, all my design terminology has flown out the window, so I cannot analyse the bracelet any further. 😛

My solution is simple. I rebuild a collection of polymer clay and equipment from scratch and start making more clay food. My flight has been rescheduled to 2nd May, and that’s at least 1.5 weeks from now, so I have to get claying! I regret not getting liquid clay while I was at the shop, since I need it for making cake icing and other creams. My logic at the time, was to limit myself because liquid clay can be very messy, and I would only need to keep busy for a few days before having to pack up. Of course, this assuming I will be able to fly at all when 2nd May comes along.

Take a look at my mini collection of Japanese branded tools and glue paint I found at Daiso. I wish all this was available in Zurich, or even in Melbourne. I also included my Fimo clay and other findings I got from Multifilla, so not everything is Daiso.
Tools

Besides clay, I’ve been thinking of getting a kiln when I move back to Australia. At first, kilns seem so expensive and unnecessary. Once I researched wattage used on stand-alone convection ovens, I was shocked! I’d rather get a kiln that uses 1000W instead of a convection oven that uses more than 1350W, 1800W or even higher. Kilns also have higher temperatures and bead doors. I can try out other crafts and even glass beadmaking, like I originally wanted. Oh now I’m so excited about moving back to Melbourne and starting a business… but only after my pets depart, as I would hate myself for abandoning them.