I now have a Flickr Pro account! I can now blog faster and embed my photos so I won’t have to upload them. Hah. I should have done this a lot earlier.


Project 2: Russian wedding ring. So, the rings come from wire. The wire has a D profile shape. They are cut into the right lengths, then bent up and the two ends must face each other flat. This makes the ring an odd shape, but not to worry. After soldering the joints, the rings are hammered on a mandrel to make them round. Then two of the rings are cut open again, so they can be interlocked and re-soldered. Once that’s done, the rings are cleaned up by hand.
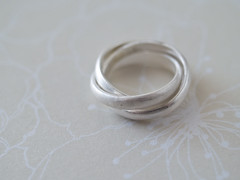
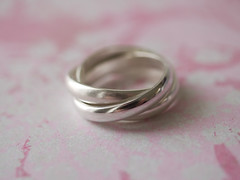
Left image shows the ring, hand sanded to remove nicks and blemishes. I have also sandblasted one of the rings to give it a texture. The right image shows the ring complete, after being polished in the vibratory tumbler for about 2 hours. It looks so flawless. Only I know where the flaws are! lol.
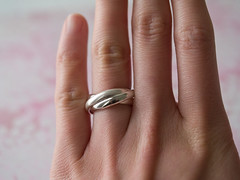
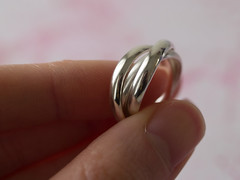
So shiny! Fits great, but I must admit that I wanted it just a tiny bit larger, to fit on my right hand ring finger during summer. Next time, I’ll add 1mm to the wire lengths. Rings are very sensitive and my measuring was not perfect.
Tag: class
I started my metalsmithing jewellery class 3 weeks ago, and at first I hated sawing metal. It was hard on my hands and I felt it was very messy and dirty. After 3 lessons, I’ve finished my first project, a brass brooch. Now I can say that I do enjoy it for the most part. It’s rewarding to have a piece of jewellery completed. It looks easy, but believe me, it takes more work. I believe it took me 6 hours to make this, a lot of the time is spent on filing and using different grades of sand paper to even out straight lines and curves. I hope I can make more at home when I have the equipment.
Anyway, on to the photos.


I love the sandblasted texture. I even put it on the back. The pin was once shiny, like a regular brooch pin back that’s glued or sewn on. I thought this would be the best finish since I can’t do this myself at home. I may be able to make a piece into a high polish if I get a rotary tool. The class uses a polishing wheel. It’s huge, and no way I could ever afford one!


It wasn’t easy to refine the curved holes. They’re still a little wonky. Luckily sandblasting hides many of the flaws. 🙂
The next project is a silver Russian wedding ring. I’ve taken some work-in-progress pics this time, and I’ll continue to do so until I finish the final piece. Not sure what the last project will be. It could be a bracelet.
I know this is really late. I realised I have not blogged about my short glass beads class. The beginners class was two months ago, and I was the only student (it was wonderful to be the only student). Beads were made and I have been wanting to buy equipment to start making my own from home, but still waiting on the return of our rental bond so I can use some of that cash. I’ll be able to make beads for my own use, but to sell, I will have to anneal them first. My instructor has an annealing service. I think it was $10 per batch + postage.
Some photos:


These were from the first day of the class. Very simple stuff, but I had some trouble getting the right amount of glass for accent dots.


Second day’s haul. Lots more complicated beads, but also more fun to make. I liked making raised flowers.


Difficult! I had trouble with making the heart shape. It’s really hard to keep the bead warm and constantly moving, while you are also trying to make a shape or pattern. My barrel beads turned out terrible, but I flattened the scenic one on the left (photo on right) and it looks better.
I still do want to make more and practice, but it’s such an expensive hobby! After getting into Blythe, it sure isn’t easy to save money. I’ll also be starting my metal-smithing short course in May. The course runs for 8 weeks, 3 hours per week. That should be interesting too! I can’t wait to solder, and then I can do this at home with a crème brûlée torch. I can’t wait to combine this with my polymer clay jewellery and also with glass beads.
Inspired by my friend Juanita and her recent blog post, I decided to play, too!
Early 2010, I wanted to:
- Get a job
- Continue German class
End of 2010, I have done neither!! I didn’t like learning German in Switzerland, maybe because of the lousy school I attended for one session. The other expensive school was always intimidating. They boasted to mainly have university graduates and bilinguals as students. They made me take a placement test. Their class “entry points” were few and far between. I would plan to start the class, but never did once the time came. As for jobs, we all know that it’s almost impossible to get employment overseas without having the right visa. I was also under-qualified, as everyone else had Masters degrees. I also don’t enjoy doing something I’m not interested in.
Plans for December 2010 and early 2011:
- Become a full time, self-proclaimed artisan
- Register my jewellery home business
- Continue once-a-week German class at the Goethe Institute, at my own leisure (there’s no rush any more, is there?)
- Take a simple silver smithing short course in December at Monash
- Take more detailed metal smithing courses at NMIT in February
- Sell at Rose St. Artists Market, Fitzroy
- Earn money
We’ll see how many goals I fulfil.